Deployment
Prerequisites
The application consists of two repositories: a Spark-powered Java backend and a Javascript frontend written with React and Redux. To install and deploy the application, you will need Java 8, Maven, Node/npm, yarn, and mastarm.
User authentication is done via Auth0. You will need an Auth0 account and application to use the Data Manager.
Installation and Basic Configuration
Clone the repo and change to the project directory:
$ git clone https://github.com/conveyal/datatools-ui.git
$ git clone https://github.com/conveyal/datatools-server.git
Copy the included configuration env templates for both the server and UI repos:
$ cp datatools-ui/configurations/default/env.yml.tmp datatools-ui/configurations/default/env.yml
$ cp datatools-server/configurations/default/env.yml.tmp datatools-server/configurations/default/env.yml
You'll then need to supply Auth0 account information (see below) and API keys for various services used in the application.
The default server.yml (for datatools-server) and settings.yml (for datatools-ui) should work out of the box, but you may want to specify alternative settings files outside of these repositories. These can be specified as a directory during datatools-ui build with mastarm:
$ mastarm build --config /path/to/configurations/dir
AND as individual file args for datatools-server:
$ java -jar target/dt-v1.0.0.jar /path/to/env.yml /path/to/server.yml
In datatools-server:server.yml, be sure to update the paths for where the databases will be stored:
application:
  data:
    mapdb: /path/to/mapdb
    gtfs: /path/to/gtfs
    editor_mapdb: /path/to/editor
    regions: /path/to/regions/geojson
Setting up Auth0
Creating account and application (client)
- Create an Auth0 account (free).
- Once you've created an Auth0 account, create an application (client) in Auth0 to use with the Data Manager with the following settings:
- enable only
Username-Password-Authenticationconnections (i.e., turn off Google) - set
Use Auth0 instead of the IdP to do Single Sign Onto true - update the following application- and account-level settings to include
http://localhost:9000(or the domain where the application will be hosted):- Account level (Account Settings > Advanced)
- Allowed logout URLs
- Application level
- Allowed Callback URLs
- Allowed Origins (CORS)
- Account level (Account Settings > Advanced)
- keep all other default settings
- enable only
Creating your first user
Create your first Auth0 user through Auth0 web console (Users > Create User). In addition to an email and password, you'll need to supply the user with the following default application admin app_metadata (user_metadata should remain empty):
{
  "datatools": [{
    "permissions": [
      {
        "type": "administer-application"
      }
    ],
    "subscriptions": [],
    "projects": [],
    "client_id": "your-auth0-client-id"
  }]
}
Update env.yml for both
Update the following properties in both env.yml files to reflect the public Auth0 application settings:
AUTH0_DOMAIN: your-auth0-domain.auth.com
AUTH0_CLIENT_ID: your-auth0-client-id
Update the following properties in datatools-server env.yml to reflect the secure Auth0 application settings:
AUTH0_SECRET: your-auth0-client-secret
AUTH0_TOKEN: your-auth0-api-token
Note: to generate the api_token, go to Documentation > Management API. After adding scopes, your token will appear in the input field.
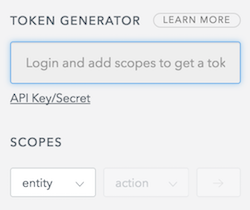
To allow for the creation, deletion and editing of users you must generate a token for the following scopes:
- users:
- read, update, create and delete
- users_app_metadata:
- read, update, create and delete`
Building and Running the Application
Install the Javascript dependencies using yarn:
$ yarn
Build and deploy the frontend to s3 using npm script (which calls mastarm):
$ npm run deploy -- s3://$S3_BUCKET_NAME/dist
>>>>>>> Stashed changes
Package the application using Maven:
$ mvn package
Deploy the application with Java:
$ java -jar target/dt-v1.0.0.jar /path/to/env.yml /path/to/server.yml
The application back-end should now be running at http://localhost:9000 (or whatever port you specified in server.yml).
The front-end assets are pointed to by the back end at whatever s3 bucket name is specified in server.yml at application.assets_bucket.
Configuring Modules
The application contains a number of optional modules that each require their own configuration settings and resources. At minimum, each module must be set to enabled: true and may require additional configuration.
Editor
Enables the GTFS Editor module.
List of configuration settings
MAPZEN_TURN_BY_TURN_KEYMAPBOX_MAP_IDMAPBOX_ACCESS_TOKENR5_URL(optional parameter for r5 routing in editor pattern drawing)
Validator
While the application handles basic validation even without the validator module enabled, the validator allows for enhanced accessibility- and map-based validation.
List of configuration settings
OSM_VEX-datatools-server:env.ymlthe validator requires the URL of a running instance of the OSM vex server.
Sign Configurations
Enables the sign configuration module.
List of configuration settings
use_extension- extension key to use for sign configurationurl- Requires
gtfsapimodule
Alerts
Enables the real-time alerts module.
List of configuration settings
use_extension- extension key to use for sign configurationurl- Requires
gtfsapimodule
GTFS+ (gtfsplus)
Enables the GTFS+ module.
Deployment
Enables the OTP automated deployments module.
List of configuration settings
OSM_VEX-datatools-server:env.ymlthe validator requires the URL of a running instance of the OSM vex server.
GTFS API
Supports other modules with API endpoints for getting GTFS entities (routes, stops, etc.)
List of configuration settings
load_on_fetch- whether to load GTFS feeds when new feed is detectedload_on_startup- whether to load GTFS feeds on application startupuse_extension- which extension to connect toupdate_frequency- update frequency for GTFS API (in seconds). Comment out to disable updates.
Configuring Extensions
The application supports integration with several third-party resources for retrieving feeds.
Integration with transit.land
Ensure that the extensions:transitland:enabled flag is set to true in config.yml:
extensions:
  transitland:
    enabled: true
    api: https://transit.land/api/v1/feeds
Integration with TransitFeeds
Ensure that the extensions:transitfeeds:enabled flag is set to true in config.yml, and provide your API key:
extensions:
  transitfeeds:
    enabled: true
    api: http://api.transitfeeds.com/v1/getFeeds
    key: your-api-key