Deployment
Prerequisites
The application consists of two repositories: a Spark-powered Java backend and a Javascript frontend written with React and Redux. To install and deploy the application, you will need Java 8 and Maven for the datatools-server and Node (>= v10 required, >= v14 recommended), npm, yarn and mastarm for the datatools-ui.
User authentication is done via Auth0. You will need an Auth0 account and application to use the Data Manager.
Two databases are required for the application:
- MongoDB (>=v2.6.4) is used to store application-level data (e.g., persisting projects and feed sources) and
- PostgreSQL (>=v9.6) for use by gtfs-lib to store GTFS data.
Installation and Basic Configuration
Clone the repo and change to the project directory:
$ git clone https://github.com/ibi-group/datatools-ui.git
$ git clone https://github.com/ibi-group/datatools-server.git
Copy the included configuration env templates for both the server and UI repos:
$ cp datatools-ui/configurations/default/env.yml.tmp datatools-ui/configurations/default/env.yml
$ cp datatools-server/configurations/default/env.yml.tmp datatools-server/configurations/default/env.yml
You'll then need to supply Auth0 account information (see below) and API keys for various services used in the application.
The default
server.yml for datatools-server and
settings.yml for
datatools-ui should work out of the box, but you may want to specify
alternative settings files outside of these repositories.
These can be specified as a directory during datatools-ui build with mastarm:
$ mastarm build --config /path/to/configurations/dir
AND as individual file args for datatools-server:
$ java -jar target/dt-v1.0.0.jar /path/to/env.yml /path/to/server.yml
In datatools-server:server.yml, be sure to update the paths for the place where databases will be stored:
application:
  data:
    gtfs: /path/to/gtfs/storage
Database setup
GTFS data storage
GTFS data storage is handled by whichever standard RDBMS you prefer. However, the application has been significantly tuned and optimized for PostgreSQL 9, so we highly recommend using PostgreSQL.
Once PostgreSQL is installed and the service has been started, create the database for instance by using the CLI createdb:
$ createdb gtfs_storage_db
Pass the URL of the database in the datatools-server's
env.yml
(and optionally add additional connection variables):
GTFS_DATABASE_URL: jdbc:postgresql://localhost/gtfs_storage_db
# GTFS_DATABASE_USER:
# GTFS_DATABASE_PASSWORD:
Application data storage
Application data storage (i.e., where projects, feed sources, and feed versions
are stored) is handled by MongoDB. There is no need to manually initialize a
database in MongoDB (MongoDB will handle this automatically if you prefer).
Connection details for MongoDB are also set in the datatools-server's
env.yml:
MONGO_URI: # defaults to localhost:27017 (MongoDB default) if empty
MONGO_DB_NAME: application_db
Setting up Auth0
Auth0 is used for authentication in the application. If you don't need authentication (e.g., if you're running locally or on a secured network), you can set DISABLE_AUTH to true for both the server and UI configurations (env.yml).
Creating account and application (client)
- Create an Auth0 account (free).
- Once you've created an Auth0 account, create an application (client) in Auth0
to use with the Data Manager with the following settings:
- enable only
Username-Password-Authenticationconnections (i.e., turn off Google) - set
Use Auth0 instead of the IdP to do Single Sign Onto true - update the following application- and account-level settings to include
http://localhost:9000(or the domain where the application will be hosted):- Account level (Account Settings > Advanced)
- Allowed logout URLs
- Application level
- Allowed Callback URLs
- Allowed Origins (CORS)
- Account level (Account Settings > Advanced)
- keep all other default settings
- enable only
Creating your first user
Create your first Auth0 user through Auth0 web console (Users > Create User). In
addition to an email and password, you'll need to supply the user with the
following default application admin app_metadata (user_metadata should
remain empty):
{
  "datatools": [{
    "permissions": [
      {
        "type": "administer-application"
      }
    ],
    "subscriptions": [],
    "projects": [],
    "client_id": "your-auth0-client-id"
  }]
}
Update env.yml for server and UI repos
Update the following properties in both env.yml files to reflect the public Auth0 application settings:
AUTH0_DOMAIN: your-auth0-domain.auth.com
AUTH0_CLIENT_ID: your-auth0-client-id
Update the following properties in datatools-server env.yml to reflect the secure Auth0 application settings.
Note: for older Auth0 accounts/tenants, it is possible to use the Auth0 secret token, which uses the HS256 algorithm, but newer Auth0 tenants will need to specify the absolute path of their .pem file in the AUTH0_PUBLIC_KEY property. This public key only needs to be downloaded one time for your Auth0 tenant at https://[your_domain].auth0.com/pem.
AUTH0_SECRET: your-auth0-client-secret # used for pre-September 2017 Auth0 accounts
AUTH0_PUBLIC_KEY: /location/of/auth0-account.pem # used for post-September 2017 Auth0 accounts
AUTH0_TOKEN: your-auth0-api-token
Note: to generate the api_token, go to Documentation > Management API. After adding scopes, your token will appear in the input field.
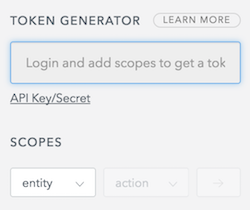
To allow for the creation, deletion and editing of users you must generate a token for the following scopes:
- users:
- read, update, create and delete
- users_app_metadata:
- read, update, create and delete`
Auth0 Rule Configuration: making app_metadata and user_metadata visible via token (only required for "new" Auth0 accounts/tenants)
If using OIDC-conformant clients/APIs (which appears to be mandatory for new Auth0 tenants), you must set up a custom Auth0 rule to add app_metadata and user_metadata to the user's token (Note: this is not the default for older, "legacy" Auth0 accounts). Go to Rules > Create Rule > empty rule and add the following code snippet. If you'd like the rule to only apply to certain clients, you can keep the conditional block that checks for context.clientID value. Otherwise, this conditional block is unnecessary.
function (user, context, callback) {
  if (context.clientID === 'YOUR_CLIENT_ID') {
    var namespace = 'http://datatools/';
    if (context.idToken && user.user_metadata) {
      context.idToken[namespace + 'user_metadata'] = user.user_metadata;
    }
    if (context.idToken && user.app_metadata) {
      context.idToken[namespace + 'app_metadata'] = user.app_metadata;
    }
  }
  callback(null, user, context);
}
Building and Running the Application
Install the Javascript dependencies for datatools-ui using yarn:
$ cd datatools-ui
$ yarn
Build and deploy datatools-ui to s3 using npm script
(which calls mastarm):
$ npm run deploy -- s3://$S3_BUCKET_NAME/dist
Package datatools-server using Maven:
$ cd datatools-server
$ mvn package
Deploy datatools-server with Java:
$ java -jar target/dt-v1.0.0.jar /path/to/env.yml /path/to/server.yml
Datatools-server should now be running at http://localhost:9000
(or whatever port you specified in server.yml).
Datatools-ui assets are obtained from the dist
folder relative the url specified in server.yml at application.client_assets_url.
While running a development server of datatools-ui,
these assets are delivered to the client using budo,
so the links defined in the backend server.yml are only used in a production setting.
Configuring Modules
The application contains a number of optional modules that each require their
own configuration settings and resources. At minimum, each module must be set to
enabled: true and may require additional configuration.
Note: for datatools-server v3.0.0, the editor and r5_network should be
disabled because they have not been refactored to handle updates to the loading
of GTFS data into an RDBMS. Please use v2.0.0 or wait for releases following
v3.0.0.
Editor
Enables the GTFS Editor module.
List of configuration settings
MAPZEN_TURN_BY_TURN_KEYMAPBOX_MAP_IDMAPBOX_ACCESS_TOKENR5_URL(optional parameter for r5 routing in editor pattern drawing)
R5 network validation
While the application handles basic validation even without the r5_network
module enabled, this module allows for enhanced accessibility- and map-based
validation.
List of configuration settings
OSM_VEX-datatools-server:env.ymlthe validator requires the URL of a running instance of the OSM vex server.
Alerts
Enables the real-time alerts module.
List of configuration settings
use_extension- extension key to use for alertsurl- Requires
gtfsapimodule
GTFS+ (gtfsplus)
Enables the GTFS+ module.
Deployment
Enables the OTP automated deployments module.
List of configuration settings
OSM_VEX-datatools-server:env.ymlthe validator requires the URL of a running instance of the OSM vex server.
GTFS API
Supports other modules with API endpoints for getting GTFS entities (routes, stops, etc.)
List of configuration settings
load_on_fetch- whether to load GTFS feeds when new feed is detectedload_on_startup- whether to load GTFS feeds on application startupuse_extension- which extension to connect toupdate_frequency- update frequency for GTFS API (in seconds). Comment out to disable updates.
Configuring Extensions
The application supports integration with several third-party resources for retrieving feeds.
Integration with transit.land
Ensure that the extensions:transitland:enabled flag is set to true in
config.yml:
extensions:
  transitland:
    enabled: true
    api: https://transit.land/api/v1/feeds
Integration with TransitFeeds
Ensure that the extensions:transitfeeds:enabled flag is set to true in
config.yml, and provide your API key:
extensions:
  transitfeeds:
    enabled: true
    api: http://api.transitfeeds.com/v1/getFeeds
    key: your-api-key