Trip Patterns
Patterns
Patterns refer to the recurring schedules and frequencies of transit trips. They can be thought of as a template for a particular route, indicating the days of the week and times of day that trips will be available, as well as the frequency of service during those periods.
Editing/Creating Trip Patterns
To begin editing trip patterns, first click the Routes tab (outlined in red). Then, click or create a route Click the Trip patterns tab, and start editing any relevant fields including:
- Name: The name of the pattern within the route is initially set by default to a designation like "27 stops from Willowridge Rd at Richgrove Dr to Kipling Station (13 trips)." However, it can be customized to a more meaningful label if desired.
- Type: Specifies whether the pattern uses timetables or schedules. For more information on the differences between schedules and timetables, consult Schedules.
- Direction: Specifies whether the pattern is inbound or outbound. This corresponds to the
direction_idfield in GTFS. All trips associated with this pattern will be assigned the direction provided here. - Editing schedules:
Click
Edit schedulesto begin creating or editing trips/frequencies for a trip pattern. You will be redirected to the Schedule Editor. For more information on creating schedules for a pattern, see Trips. - Use timetables/frequencies - whether the pattern uses timetables, i.e., individual entries for each trip made over the course of a day, or frequencies, which define varying frequencies (or headways) according to time intervals over the course of a day.
- Direction - corresponds to the
direction_idfield in GTFS. All trips associated with this pattern will be assigned the direction provided here.
Editing schedules
Click Edit schedules to begin creating or editing trips/frequencies for a trip pattern. You will be redirected to the Schedule Editor.
For more information on creating schedules for a pattern, see the Trips section.
To add a pattern, click the + New pattern button (highlighted in yellow).

Pattern editing tools:
The pattern toolbar contains several helpful buttons to help with the pattern editing process.

- Zoom to pattern extents: Clicking the search (🔍) button (in the top toolbar) with a pattern selected adjusts the map view to show the entire pattern you are editing.
- Duplicating pattern:
Used to create a similar, but different trip pattern. When duplicating of the active pattern, its name becomes
[Pattern name] copy. - Reverse pattern: To reverse the sequence of stops for a pattern, click the button with opposing arrows. Note: this is a destructive action and should usually only be used after duplicating a pattern.
- Delete pattern: Deletes the active pattern. Note: deleted patterns cannot be recovered.
Stop sequence
Adding stops
To begin constructing a pattern, click + Add stop. You can then search for stops to add by name in the dropdown that appears or zoom into the map and add stops by clicking on them and clicking + Add stop.
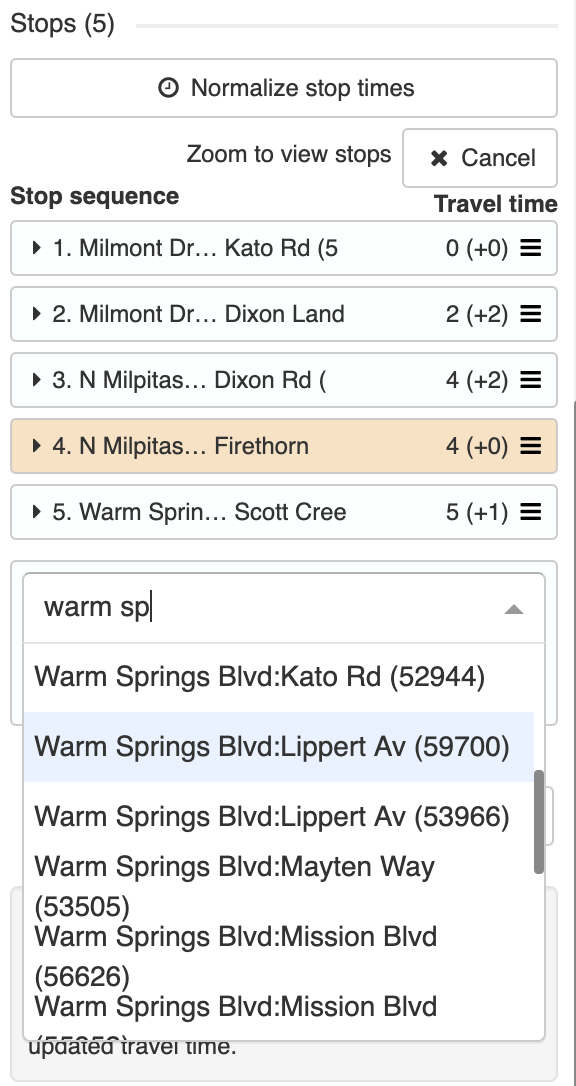
As you add stops, the pattern shape will update according to the street network. Keep selecting and adding stops in the sequence the route passes through them until the route is complete.
Inserting stops mid-sequence
First, click the From Stops button so that Datatools knows the pattern can be regenerated by editing stops. If you realize that you have missed a stop from the sequence, it can be added after the fact. When adding via the dropdown, stops can only be added to the end of the sequence; however, if you're adding via the map, you can choose where exactly to insert the stop.

Pattern stop toolbar
The pattern stop toolbar can be found by clicking the pattern stop in the map view.
- Save: saves any edits to the travel and dwell times.
- Edit: allows user to begin editing the stop's details (clicking the browser Back button will bring you back to editing the pattern). Note: be sure you have saved any pattern information before jumping to edit a stop.
- Remove: removes the stop from the pattern.
- Add: add the stop to the sequence at an additional location. This is useful for patterns that might visit the same stop more than once (e.g., loop routes).
Changing the order of stops
First, click the From Stops button so that Datatools knows the pattern can be regenerated by editing stops. If a stop is in the wrong order, you can click and drag and drop the stop from the list view into the correct sequence. The sequence displayed on the stop being dragged will only update after being dropped into place.

Removing stops
Stops can be removed from the pattern by clicking the red trash (🗑) icon found in the expanded stop card or by clicking the pattern stop on the map view.
Stop timings
Pattern stop colors
Pattern stops shown in the list with an orange color represent stops that have no travel time defined. In many cases this is acceptable -- e.g., when stops along the pattern do not represent timepoints and are intended to be interpolated or are otherwise intentionally left blank.
Sometimes, however, leaving travel times blank is unintentional and these values should be filled in with a mm:ss (minutes + seconds) value. Once the value is filled and saved, the orange color will change to a pale green.
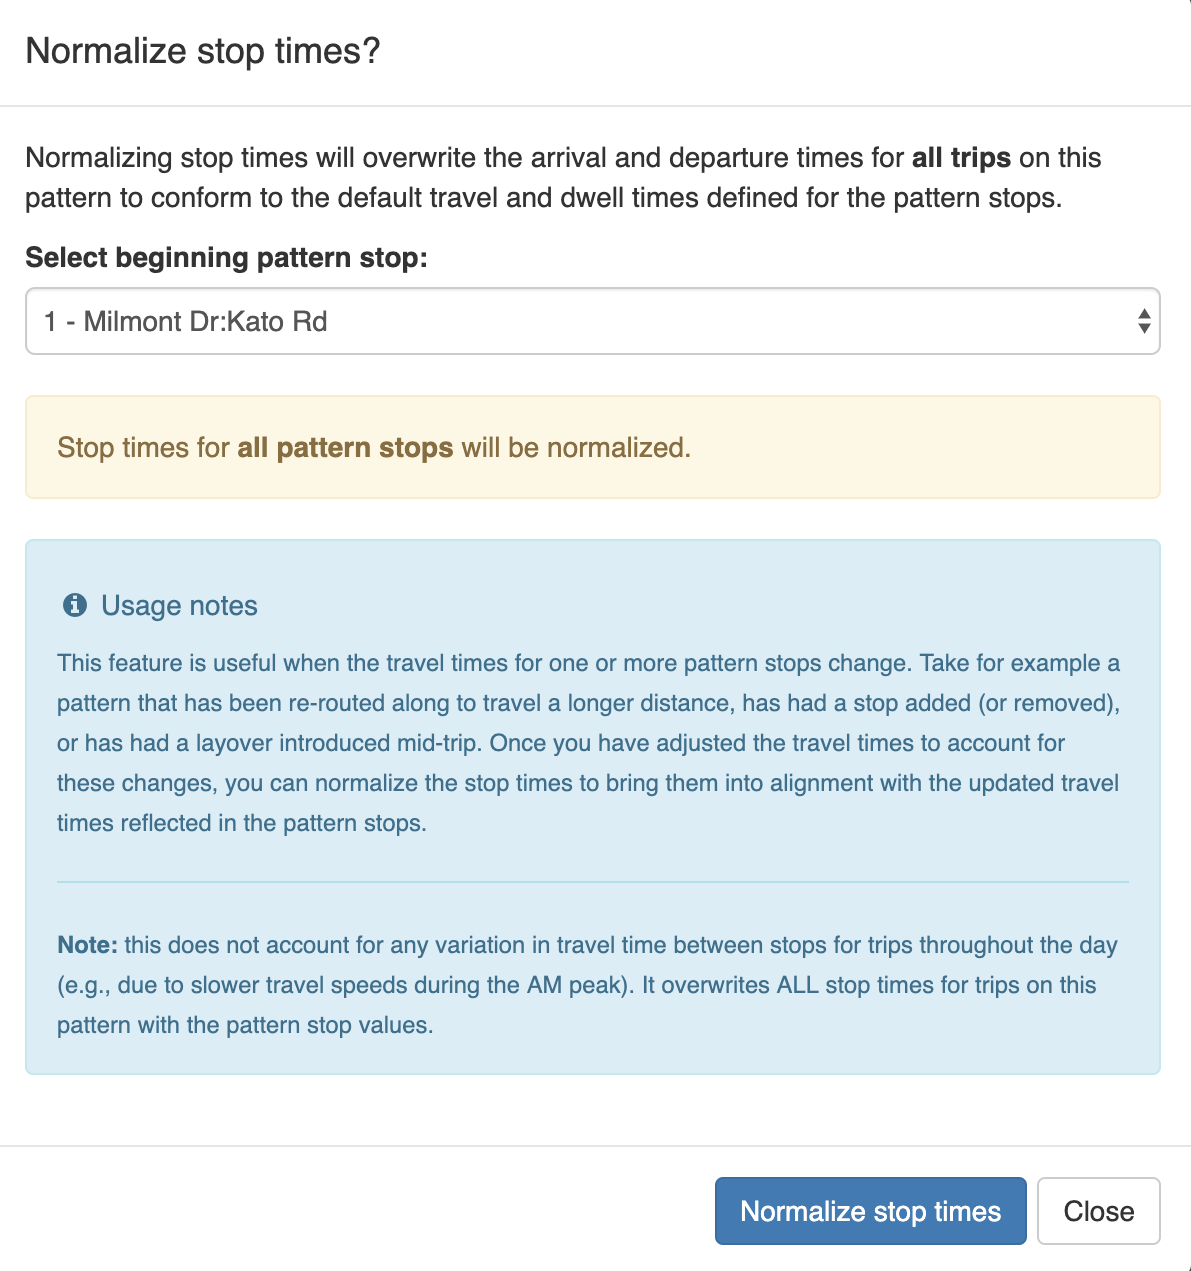
Normalize stop times
Whenever a pattern stop is added, inserted, or removed from a pattern, a warning will appear in the upper right hand corner of the screen. This message will prompt you to to adjust the default travel time for the pattern stops based on whichever action you took. For example, if stop #3 was removed, the travel time between stops #2 and #4 (now #3) may need to be increased to account for the change in distance traveled.

Once you have adjusted the stop timings, another warning will appear prompting you to click Normalize stop times. This button gives you a way to apply the change in pattern stop timings to any and all of the pre-existing trips for the pattern. It prevents you from needing to adjust these trips manually. After clicking Normalize stop times, you will be shown the following prompt asking you to define which stops you would like to normalize (the default is for all stops/stop times to be normalized). Once you confirm, you will receive a message confirming how many stop times were updated.
Interpolation
Datatools features two interpolation modes.
"Interpolate stop times between timepoints" ignores all non-timepoint pattern info. The timepoint timings are assumed to be in realation to the previous timepoint.
"Only update blank stop times" only updates blank stop times. Datatools will use shape data and non-blank stop times to calculate likely stoptimes. Stop times with values will be ignored.
Calculate timings
The average speed for the route can be used to calculate all the time gaps between stops in one go. A few parameters can be specified before calculating times:
- Average speed - average speed (in km/hr) to use when calculating timings
- Dwell time – allows you to assign the same dwell time to all stops within a trip pattern
Once the stops have been added and the pattern alignment is drawn simply click Calc. times and the time between stops will automatically fill in.
Another option is to click the Normalize stop times button above all the stops make all arrival and departure times on the pattern match a default travel time for each stop.
Manual timings
Specific timings for each pattern stop can be set by either clicking on the stop on the map view or expanding the stop card in the list view. The two types of times that can be edited are:
- Travel time: the time it took to get from the previous station (should be 00:00 on the first stop of the sequence)
- Dwell time: the time the vehicle rests at the stop
When using timepoint interpolation, these timings are assumed to be in relation to the previous timepoint. Otherwise, they are assumed to be in relation to the previous stop.
Tutorial Video: Editing/Creating Patterns
The following video demonstrates how to create patterns as outlined above, in a step by step manner.
Editing/Creating Pattern Geometry
As mentioned above, pattern shapes will begin to draw automatically as stops are added in sequence. However, if you need to make adjustments to the auto-generated shape, clicking Edit pattern geometry will allow you to begin editing the shape segments between stops.
Basic editing
While editing a pattern shape, there are a few behaviors you should be aware of:
- Dragging a handle (✕) will create a new alignment between stops or surrounding handles
- Clicking the pattern will add additional handles to the segment
- Clicking added handles will remove them (Note: only grey handles can be removed)
Shape toolbar
Before editing
- Edit: Begin editing the pattern shape
- Delete: Delete the pattern shape
- Create: Creates alignment that follows streets from pattern stops
While editing
- Save: Save changes to pattern shape and leave editing mode
- Undo: Undo last change
- Cancel: Cancel edits and leave editing mode
Edit settings
- Snap mode selector - Use the dropdown selector to choose how pattern segments between handles and stops are aligned. The available snapping modes are:
- Snap to streets - snaps segments between handles and stops to streets. Can toggle the 'Avoid highways in routing' checkbox as needed.
- Snap to rail - snaps segments between handles and stops to rail.
- None - segments will form straight lines between handles and stops.
- Hide stop handles: Keeps shape segments snapped to stops. If unchecked, stop handles will become draggable. In most cases, this setting should remain checked.
- Hide inactive segments: Toggles whether to show segments that are not currently being edited.
- Show stops - Toggles whether stops are visible because sometimes stop markers can get in the way when trying to draw shapes.
- Show tooltips: Toggles whether to show tips when hovering over a segment, e.g. "Click to edit segment" or "Click to add control point".

Editing modes
There are a few different editing modes that allow for the quick and easy creation of pattern shapes:
- Drag handles: (default) Drag handles to change the pattern segment between stops. This mode is also in effect during the advanced modes listed below.
- Add stop at click: At each click on the map, a new stop is generated and the pattern is extended to this stop.
- Add stop at interval: At each click on the map, stops are generated along the auto-generated pattern extended to the map click at the user-defined spacing interval from 100 to 2000 meters.
- Add stop at intersection: (experimental, not available in all regions) - at each click on the map, stops are generated along the auto-generated pattern extended to the map click according to the user-defined parameters:
- Offset from intersection: Distance the stop should be placed from the intersection
- Before/after: Whether the stop should be placed before or after intersection
- Every n intersections: The number of intersections at which each new stop should be placed
Note: the last three advanced editing modes should only be used when creating routes in new areas where stops don't already exist.
Tutorial Video: Editing Pattern Geometry
The following video demonstrates the steps for editing patterns, as outlined above.